GUI tests automation - Tutorial
www.piotrkaluski.com
pkaluski@piotrkaluski.com
Note
I no longer maintain this tutorial here. It has been moved and became a chapter in documentation for Win32::GuiTest module. I keep this file here in order to keep external links working, but in order to get the most recent version of the tutorial please go to Win32::GuiTest documentation.Introduction
This document may serve as a tutorial on 2 topics – using perl module Win32::GuiTest and on the basics of automated testing of Gui applications. The untented audience are perl developers, who want to use Win32::GuiTest, and all other people who maybe interested in knowing what is automated GUI testing all about.
Prerequisites
You may just read the tutorial. It should give a good understanding of how is GUI automation implemented. But it would be much more effective if you practice all examples, which are given in this document. In order to do it, you should have the following software in place:
-
WinNT/2K/XP system
-
Perl with Win32::GuiTest module installed
-
WinSpy – you can get it from http://www.catch22.net/software/winspy.asp
Terminology
In order to avoid confuses, I will use the term Win32 in order to refer to WinNT/2K/XP operating system.
Let's start
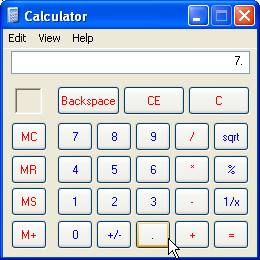
Although it is not always true we can say that generally, all windows which are opened on your screen are system objects. Win32 keeps track of them and can give information about them. Let's practice from the very beginning. Launch the calculator application available in Win32 systems. On my machine it looks like this:
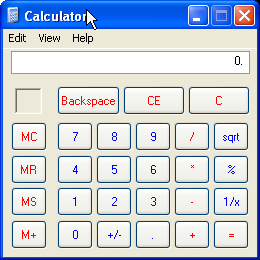
If it does not look like this on your machine, go to „View” menu in Calculator and choose "standard". Although keeping "scientific" will not do any harm, using the standard version will help us avoid confusion.
Now run WinSpy.

Click the "Full screen" button as shown above...
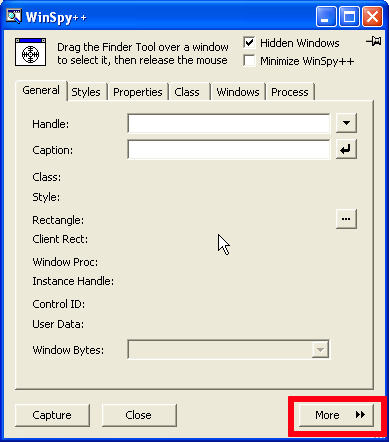
and then "More" to get the window given below:
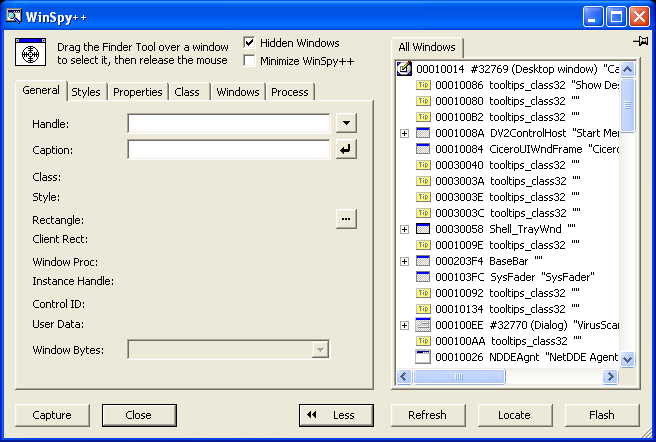
On the right side, you can see a tree, reminding a tree of catalogs. Find an item, which is named exactly in the same way, as your Calculator window. The title of the window, also called caption is placed here. In my case it is „Calculator”. If you use Win32 with different language, the title may differ. Whatever the title, try to find an item with this title in WinSpy tree.
Got it? Now place Calculator and WinSpy in a way that they don't overlap so you can see them both. Click on the item you've just found in WinSpy and click "Flash" button in the bottom right corner of WinSpy window. Did you notice that? Borders of Calculator were blinking for a moment. This feature helps you to make sure that the item from the tree relates to the right window. Try to experiment with other items. Go to the top of the tree. Choose "Desktop window" item. Click "Flash". Frame of the the whole screen blinks. Try with other items.
Once you played a little bit, we can come back to Calculator.
Imagine that you want to automate the following scenario:
-
Using keyboard calculate 2+5.
If a user want to do such an operation on Calculator, he/she has to do the following:
-
Launch the Calculator application or if it is opened – click on it.
-
Type the right keys
Actually, in the step one, clicking on the opened application (or using Alt-Tab to switch to this application) is a way of doing something important. You move the input focus to Calculator. In Win32, window needs to have a focus in order to receive all input from the keyboard. When you have several applications opened, and you type something, only one application, this with the input focus, actually react on what you type.
OK. We have prepared the first test case scenario. Let's write a perl script, which will do it for us. Let's assume that Calculator application is opened when the perl script starts.Firstly the script has to move the input focus to Calculator. But which window is Calculator? And how to manipulate this window?
We will need to use the function FindWindowLike:
use Win32::GuiTest qw( FindWindowLike );
use strict;
my @whnds = FindWindowLike( undef, "^Calculator" );
if( !@whnds ){
die "Cannot find window with title/caption Calculator\n";
}else{
printf( "Window handle of calculator application is %x\n", $whnds[ 0 ] );
}
Of course, if you are using Win32 for different language (like Polish), You will have to change the search title to the right one ("Kalkulator" for Polish).
FindWindowLike returns a list of window handles. Window handle uniquely identifies a window in the system. In any time, there could be only one window with the given window handle, which is a long number.
Why does it return a list? We want only one window, don't we? FindWindowLike is a flexible function, which allows to specify search conditions for the group of windows. In that case, it will return handles of all windows, which satisfy these conditions. In our call, we specify that we are looking for a window with title "Calculator". In most cases only Calculator window will match. However, if there is another window opened which contains "Calculator" string in its title, its handle will also be returned. The second parameter of FindWindowLike function is treated as a regular expression to match with all windows' titles.
Try to run it now. If your
calculator application is opened you should get something like:

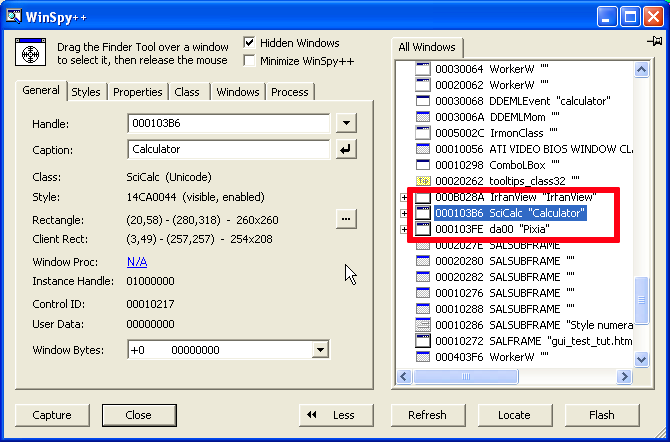
Window handle of calculator application is 103B6 (hex). Note that it matches the window handle shown by WinSpy on the picture above. Remember – WinSpy shows most of numbers in hexadecimal notation. For perl, the default notations is decimal. Keep that in mind while looking for reasons, why perl script does not display the handle displayed by WinSpy.
So we have found the window. Now we have to move focus to the window and then type the right keys.
We move focus using function SetForegroundWindow. And we send keys using SendKeys.
Our script will look like this:use Win32::GuiTest qw( FindWindowLike
SetForegroundWindow
SendKeys );
use strict;
my @whnds = FindWindowLike( undef, "^Calculator" );
if( !@whnds ){
die "Cannot find window with title/caption Calculator\n";
}else{
printf( "Window handle of calculator application is %x\n", $whnds[ 0 ] );
}
SetForegroundWindow( $whnds[ 0 ] );
SendKeys( "2{+}5=" );
SetForegroundWindow takes a handle to a window, which should receive the input focus. The SendKeys sends the keys to the window, which has the input focus. "+" has a special meaning for SendKeys so it has to be taken in braces.
Let's try. When you run the script, the Calculator's window will move to front and then it will display "7" (before it displays "7", it will also display "2" and "5", however it would be done so quickly, that you will not notice that).
Have a look at WinSpy again.
Notice
that Calculator item in WinSpy tree has a plus. Plus suggests that
you can expand an item and find something more in it. Let's do it.

You can see more items. What are they? Well, check it yourself. Try to highlight them and see what blinks. You will quickly realize that these items are Calculator's buttons and display. They are windows too! Windows, which have some characteristics different from Calculator's main window, but they are windows.
Find the window, which is a "2" button. Click it. Look what WinSpy says about it. It gives you the window handle. It also display information about control id.
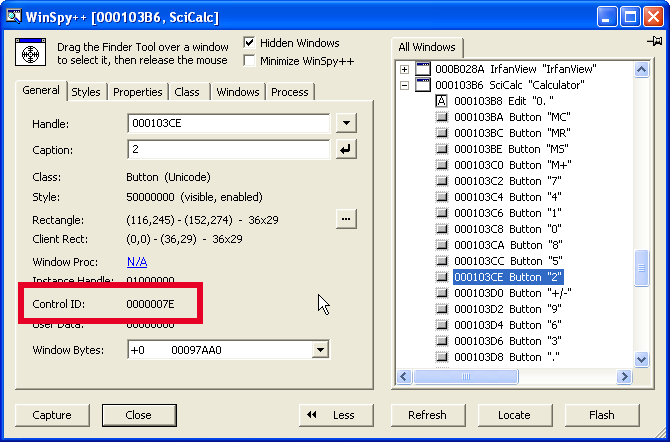
Each window has a control id. It does not have any particular meaning for main windows, however, it does for windows, which belong to other window (are children of other window). Such windows (belonging to other window) are also called controls. Control id is used to uniquely identify child window amongst other children on the same parent window (this is not always true. It may happen that a parent have several children with the same id). Find all buttons we need and write down their control ids. They should be:
|
Button |
Control id (Hex) |
Control id (Decimal) |
|---|---|---|
|
"2" |
7E |
126 |
|
"5" |
81 |
129 |
|
"+" |
5C |
92 |
|
"=" |
70 |
112 |
Notice, that control ids are static. This means, they are always the same for each instance of the same application. Control id for "2" button is 7E on my machine and is also 7E on your machine. Control ids are given to controls when the program is designed. They are hard coded in the program. Window handles are not. If they are the same on my pictures and you machine it's a pure accident. Window handles are dynamic. A window is given a handle every time it is created by the system. If 2 instances of the same application are created (say, you will run Calculator twice), they will have totally different set of windows' handles.
Our "buttoned" test will look like this:
-
Find a window
-
Push all necessary buttons.
You push a button by calling PushChildButton. It takes 2 arguments : window handle of the window on which the button is placed (parent window), and the control id of the button you want to push.
Here is the code:
use Win32::GuiTest
qw( FindWindowLike
PushChildButton );
use strict;
my @whnds =
FindWindowLike(
undef, "^Calculator" );
if( !@whnds ){
die
"Cannot
find window with title/caption Calculator\n";
}else{
printf(
"Window handle of calculator application is %x\n", $whnds[ 0 ] );
}
PushChildButton( $whnds[
0 ],
126 ); # Button 2
PushChildButton( $whnds[
0 ],
92 ); # Button +
PushChildButton( $whnds[
0 ],
129 ); # Button 5
PushChildButton( $whnds[
0 ],
112 ); # Button =
Notice that you do not have to move the input focus to Calculator. That's because you specify exactly, which button in which window you want to push.
Run it. Again, Calculator should display 7.
We are now able, to make the script doing typing and pushing for us. The really automated test also requires that the results are automatically checked. So the thing we miss is checking if when adding 2 and 5 Calculator actually displays 7.
We have to go back to WinSpy again. On the very beginning of controls belonging to Calculator, there should be a control of type "Edit". As you may guess, Edit control is also a window, with some special features, like displaying a text. You get the contents of the Edit control by calling WMGetText. It takes as a parameter a window handle of the Edit control. So in order to use it in our code, we have to find out a window handle for the Edit control. We actually have to implement finding this handle. We cannot hard code it, since you never know what would be the window handle of any window. But when you have the control id and window handle of a window, which is a parent of the Edit control, you can easily get window handle of that control. The function, which is going to help you is again FindWindowLike.
First the script, then the
explanation:
PushChildButton
WMGetText );
use strict;
my @whnds = FindWindowLike( undef, "^Calculator" );
if( !@whnds ){
die "Cannot find window with title/caption Calculator\n";
}else{
printf( "Window handle of calculator application is %x\n", $whnds[ 0 ] );
}
PushChildButton( $whnds[ 0 ], 126 ); # Button 2
PushChildButton( $whnds[ 0 ], 92 ); # Button +
PushChildButton( $whnds[ 0 ], 129 ); # Button 5
PushChildButton( $whnds[ 0 ], 112 ); # Button =
my $edit_ctrl_id = 403; #Edit window, 193 Hex
my @edit = FindWindowLike( $whnds[ 0 ], undef, "^Edit", $edit_ctrl_id );
if( !@edit ){
die "Cannot find window handle for Edit control\n";
}else{
printf( "Edit window handle is %x\n", $edit[ 0 ] );
}
my $result = WMGetText( $edit[ 0 ] );
if( $result != 7 ){
print "Test failed. The result is $result and expected value was 7\n";
}else{
print "Success. The result is $result, which is as expected\n";
}
As you can see, the only thing we add is finding window handle of edit window and then get text from this window. Then the text is compared with the expected value.
You should get something like
this:

Note: this time main window handle is different. This is because I closed Calculator and ran it again. As you already know, it was given a different window handle during the second run.
Congratulations! You've done the fully automated GUI test.
Going further
As you can see, the basic concepts behind automated gui testing are not that difficult. However, I have some bad news for you. Gui testing is more complex then it appears after reading this tutorial. The one object – one window pattern is not followed even for some basic controls. One of them is toolbar. If you examine with WinSpy any application containing a toolbar, you will see that WinSpy sees only one window – the toolbar. Buttons on the toolbar are not seperate windows. So you can't work with toolbar in a way you did with calculator. We need to use some more sophisticated mechanisms.
Also, some types of applications are seen by the system as one window with no children. Java applications behave this way. No matter how many controls they have, they are seen as single window by Win32 (and, what follows, by WinSpy).
But there is still much interesting stuff you can do with Win32::GuiTest perl module.
Recommended reading.
As for the support for the Win32::GuiTest module, there are the following places when you can look for help:- perlguitest group at yahoo: http://groups.yahoo.com/group/perlguitest/join
- Winguitest project on Source Forge: http://sourceforge.net/projects/winguitest
If you have some experience with perl, look at the module's documentation and the code. Look at provided examples and the test code. They are excellent in explaining how the whole thing works. If you also know C, try to get .xs file. You will see that many functions are actually simple wrappers for Win32 functions.
Understanding Win32 windowing mechanisms would be a big help. I can recommend you the following books:
-
Programming Windows 5th edition, by Charles Petzold – I can't say anything original here. Excellent book on Windows, a must read for someone who wants to get a grasp of what are Win32 all about.
-
Programming Applications for MS Windows 4th edition, by Jeffrey Richter – Another excellent book. Compared with Petzold, this book focuses more on system internals, whereas Petzold focuses on stuff related to windowing.
-
Programming Windows with MFC (2nd edition), by Jeff Prosise – Called "Petzold for MFC". Contains good explanation for toolbars and other controls.
-
Documentation for Win32 API can be found on Microsoft's MSDN.
If you liked this tutorial, you can also check my website www.piotrkaluski.com. Who knows, maybe I will write more :)
Comments
If you found any errors, typos (don't be shy to bother me about typos) or have any kind of comments, send me an e-mail: pkaluski@piotrkaluski.com.